Category Archives: Linux

Things that involve Linux.

Using Ubuntu touch on a Nexus 5

Well, this is an interesting one. I decided to go ahead and dig through my old parts bin and came across my much loved Nexus 5 android phone. Since I had just recently went ahead and discovered that OpenWRT has RTL-SDR capabilities, I wondered whether I could achieve a similar feat on the Nexus 5. This became an interesting rabbit hole to go down. I have recently been using a Raspberry Pi 3 as a base-station for my RTL-SDR hobbies (capturing NOAA satellite passes, attempting to receive SSTV images from the International Space Station, listening to ADS-B traffic, decoding pager traffic, and decoding information on 433 MHz). It works quite well when it is within range of my home network, but away from there, it becomes a bit more tricky due to the lack of a real-time clock, my propensity for configuring everything through SSH, and not wanting the additional battery draw from a dedicated screen. The Nexus 5 has a screen, decent battery, ability to connect to USB devices using an OTG cable, and most importantly runs Android (This is where my opportunity starts).

Android is, in my opinion, a great mobile operating system. Unfortunately, for my needs it is too locked down since I enjoy running non-standard drivers and thoroughly enjoy a tool called AutoWX2 to capture satellites. AutoWX2 is a collection of python scripts that greatly simplifies capturing satellite passes, and in the downtime between passes, listens to other radio traffic. Keep in mind, all of the following steps will be using Linux to perform all of the commands referenced.

The first step in all of this is to get a full Linux system installed on the Nexus 5. This is accomplished easily enough with the UBPorts tool to install Ubuntu Touch available here. Following the on-screen directions will install Ubuntu Touch to the Nexus 5.

Next up, problem number 1. The root file system for Ubuntu Touch has a size of 2 GB, out of which 130 MB are available for additional software. Well, this presents an issue as the first time we “sudo apt update && sudo apt upgrade -y && sudo apt dist-upgrade -y” we fill this 130 MB with apt cache files and downloads, and then the phone stops attempting to install updates. This is even before we attempt to install Python, git, build-essential, and additional software required to get our all in one system running.

Looking through various forums provided possible options for getting a larger root partition, or failing that, Ubuntu Touch has Libertine available, which allows a sandboxed Linux environment. All of the options I attempted, rewriting the ubuntu.img or system.img (either should work as they are hard links pointing to the same inode) file to append additional data to the end and then resizing the filesystem afterwards failed. I was about to attempt installing the software through Libertine, when I had an epiphany. The file system is mounted on boot. With the file system mounted on boot, I cannot change the underlying system, and rebooting after changing it won’t help as on reboot, it still sees the ubuntu.img as 2GB although it shows as larger when using “ls -hl /userdata/ubuntu.img”. The necessary steps are to first install a recovery firmware that supports adb connections. For this I used TWRP. To install the recovery, reboot the phone to fastboot by holding volume down + power, and upon boot you should see the andoid. Once connected, navigate to where TWRP downloaded in terminal and issue “fastboot flash recovery twrp-3.3.0-0-hammerhead.img” changing the twrp part to match the version downloaded. Once the recovery is flashed, we can “Recovery Mode” by using the volume up/down keys to select that option, and using the power button to perform the reboot.

Once inside the recovery is loaded, we want to mount the partition of /dev/block/mmcblk0 that contains our file system. This is the point where we have to find out where the file system resides. First verify that the phone is recognized as an adb device using “adb devices”. If recognized, you will see List of devices attached, a hex number and recovery. You may need to disconnect and reconnect the USB cord a few times to have it recognized as an adb device. By default, the system/ubuntu image is accessible on a mounted partition located at /data/ . In order to get the image off the phone where we can modify it, we again rely on adb, this time using “adb pull /data/ubuntu.img ./” This will take a few minutes to transfer as the file is 2 GB and will be transferring by USB.

Once the transfer is complete, we can resize the image file using dd. To make the image approximately 6GB we use “dd if=/dev/null of=./ubuntu.img bs=1M seek=6000 count=0” to make the file larger or smaller, modify the seek parameter to be how many MB you want the image to be. Once this completes (should be extremely quick) run “ls -hl” to verify that the file is now resized.

Should look like this if using 6000

Next step is to check the filesystem using “e2fsck -p ./ubuntu.img”. Using the -p switch automatically fixes any errors found. Once the file check is complete, we need ensure the file system is informed about the changes. To do this we use “resize2fs ./ubuntu.img”. Once complete we then use adb to transfer the image back to the phone. This is accomplished with “adb push ./ubuntu.img /data/ubuntu.img”.

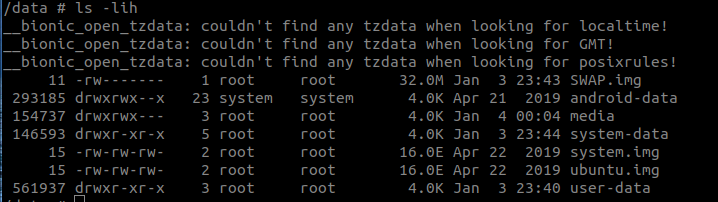
When the file has completed transferring we have one last thing to do. We need to recreate the hardlink from ubuntu.img to system.img. Connect to the phone using adb using “adb shell” and then “cd data”. If we “ls” here we should see the following.

Almost done\

Since we have destroyed the hardlink, we need to remove the system.img, and then recreate the hardlink. This is done with “rm system.img && ln ubuntu.img system.img”. This command first deletes the system.img file, and then recreates the file as a hardlink to ubuntu.img. This can be confirmed using “ls -lhi” which lists the files, sizes in human readable format, and lists the inode (where on the disk the file is stored).e2fsck -p /dev/sdb1

On my phone, the inode of both system.img and ubuntu.img is 15 (the first column) showing that both files are the same as they reside in the same location on the disk. Don’t worry that the size is misreported as it is a limitation of busybox. Upon reboot into the full Linux distro, it is reported correctly.

Once complete we can reboot the phone normally, set a passcode (needed to enable developer mode), and enable developer mode under the about section in settings. At this point, any software available in the repositories is available to be installed to your shiny Ubuntu phone!

After fussing with this setup for multiple days, I came to the realization that autowx2 will not run on the Nexus 5 due to a lack of 64-bit python to run pypredict, which relies on pyradiomics. If anyone has any suggestions on an alternative automated weather satellite and SSTV from the ISS receiver, please offer suggestions.

Loftek LK5200 as an rtl-sdr server

The sacrificial offering.

I have had this router sitting in a bag for approximately 4 years. About 2 years ago, I had the idea that it would be a good platform to try to build a pineapple if it supported OpenWRT as I had already done a TP-Link MR3020 to be one, and the Loftek had a built in battery, making it easier to deploy. I went through various attempts to find a way to install OpenWRT on the device to no avail. I finally came back to the LK5200 today, and decided to dig a little deeper. To start with today, I opened the case.

You can see its bare circuits

An AR9331-AL1A is the processor that this device uses. Well, we know that it is an ARM processor, and it is very similar to the one in the MR-3020. (Exactly the same as the V1.8 of the hardware). This bodes well for me. Before I go and attempt to flash this though, let’s see what else I can find out about the device. Connecting the router to my network, the defaults are to not use DCHP and instead assign itself a static IP of 192.168.168.1, so I’ll use that address and run an nmap scan on it with “nmap 192.168.168.1 -vv”. The image below shows the results.

Hmmm. These look normal. Almost.

This gives us a listing of all of the open ports. Port 53 is a DNS server (expected), port 80 is the admin interface webserver (expected), ports 139 and 445 are used for Samba shares (expected as there is a usb port for file sharing on the network), and port 8181 is … Wait, what is that? It’s up in the non-privileged area. Most times i’ve come across this port it’s another webserver. Let’s try and get to it in the browser.

Odd, it looks like a command prompt and a banner for OpenWRT.

That is interesting. It seems as if the Loftek LK5200 is already running OpenWRT. Let’s try connecting to the same address and port with telnet using telnet 192.168.168.1 8181

Well, that was easier than I thought it would be.

Now I have access to the root shell on the router. First thing to do is update the package listing because I don’t believe it has ever been done. This is accomplished with opkg update . Once done, I install rtl_sdr with opkg install rtl_sdr. This installed all of the tools for using my neSDR smart as a SDR receiver. One last thing to do is blacklist the original driver built into the kernel. On this device there was no /etc/modprobe.d/ folder, so it had to be created with mkdir /etc/modprobe.d/ . Then we needed to create the blacklist.conf file underneath the directory we had just created. To do this use, echo “blacklist dvb_usb_rtl28xxu” >> /etc/modprobe.d/blacklist.conf . This command puts what is inside the quotes into a the file “blacklist.conf” in the directory “/etc/modprode.d/”.

A simple reboot later, and we can plug in our USB SDR stick, login over telnet as before and run the rtl_tcp program to feed the data to another device on the network. This is accomplished with rtl_tcp -a 192.168.168.1 . This command effectively creates a server that feeds the data received by the SDR to another machine on the network. The -a in the command tells rtl_tcp which address to serve it on. Now we can load up whatever our preferred application to view the stream (which for me is GQRX). If it’s your first time loading GQRX, you will be greeted by this screen, which should be filled in thusly.

Look at all the numbers!

After clicking OK, you may then press the play button and search the waterfall for interesting things.

This is definitely an interesting thing.

POCSAG on the Raspberry Pi

Back in October of 2018, almost immediately after being laid off, I finally achieved a long time goal of getting my ticket punched. Since then I have been a proud owner of a general class amateur radio license. While I greatly enjoy being able to broadcast, passively listening to all of the devices around me has become something of a passion. While the FCC license is not required to listen, studying for the exam shored up my knowledge on antenna theory and provided a path to build my own antennas tuned to the frequencies I wished to capture.

Over the past weekend, an interesting topic arose. Medical/emergency pagers are still used nationwide: Can we receive these signals and decode them using an approximately $20 RTL-SDR adapter? Some quick research revealed that the software exists, and it is incredibly easy to do. Let’s get started. I am starting out with a fresh install of Raspbian Stretch Lite available at https://www.raspberrypi.org/downloads/raspbian/ , a Raspberry Pi Model 2, and the NooElec NESDR Smart. The same process can be done with any variation of the Raspberry Pi, you will most likely require a powered USB hub to use the SDR.

I won’t go into the details of writing the image to an SD card, nor setting up the pi to be accessed headless with networking enabled on first boot, as that has been covered more times than I care to count, although I do need to lookup the formatting of the wpa_supplicant file on each new install (note: keep a copy for future use).

After the initial boot and required resizing of the file system, log in over ssh without having the SDR plugged in. As always, we want to update our fresh install so that we aren’t pulling in outdated packages. Connect via SSH and update. This is done with “sudo apt update && sudo apt upgrade -y && sudo apt dist-upgrade -y”. Sit back, relax, and wait approximately 20 minutes for this all to complete.

Once the updates are complete, I like the first this I install to be screen. This allows me to continue where I left off, even if my WiFi drops for some reason. The key thing is to remember to launch “screen” on login, and if disconnected use “screen -r” on re-connection. This will allow the install to continue if you get disconnected.

The next step is to install all of the software required to build our packages. Some distributions may include multimon-ng as a download in their package manager, however I like to have the bleeding edge version and this means compiling from source. Let’s go ahead and install all of the packages that we will need to run everything. To install the prerequisties, type “sudo apt install git cmake build-essential libusb-1.0 qt4-qmake libpulse-dev libx11-dev qt4-default -y”. Sit back and await completion of the install.

Once this is done, we can get to the fun part. Create a new directory in your home folder to hold all of the source code you will be getting. this can be called sdr, source, src, or whatever you like. I’m going to use source, because I like descriptive names. To make the directory and enter it in one line “mkdir ~/source && cd ~/source”.

Next we are going to build our rtl-sdr drivers and blacklist the default ones built into the kernel. The source code for the rtl-sdr driver we want to use, as well as some additional useful programs for providing a raw datastream from the SDR is available at https://github.com/osmocom/rtl-sdr. To pull it to our Pi easily we use “git clone https://github.com/osmocom/rtl-sdr”. Things will happen and when done, a new folder appears called rtl-sdr. Next, change to the rtl-sdr directory with “cd rtl-sdr” and make and change into a new directory called build with “mkdir build && cd build”. Now inside the build directory we can use cmake to create a makefile; this is done with the command “cmake ../ -DINSTALL_UDEV_RULES=ON” the -DINSTALL_UDEV_RULES=ON tells cmake to create a makefile that will include udev rules for our adapter. Once this is done, run “make” then “sudo make install” and finally “sudo ldconfig” to add the udev rules to the system. This should blacklist the default drivers, but to be sure, I like to “sudo nano /etc/modprobe.d/blacklist.conf” and add the following, each on a new line: “blacklist dvb_usb_rtl28xxu”, “blacklist dvb_core”, “blacklist rtl2830”, and “blacklist dvb_usb_v2”. Use CTRL+X to exit nano, type “y” and press enter to save.

Next we are going to get the source and compile multimon-ng. We are going to go back to our source directory using “cd ~/source” and we will get the source code from https://github.com/EliasOenal/multimon-ng using git clone again like so, “git clone https://github.com/EliasOenal/multimon-ng”. Once that is done, “cd multimon-ng && mkdir build && cd build” to enter the directory git created, make a build directory inside that directory, and finally change into the build directory. For this program, we are going to rely on qmake as the author provided a .pro file to help automate the build. To invoke this use “qmake ../multimon-ng.pro” and patiently await the creation of the makefile. Once complete run “make” followed by “sudo make install”.

With all of the required programs installed, we can now start listening for pager traffic. The best way I have found to locate the frequencies (which vary based geographic location) is to use the SDR along with a program that provides a waterfall display. You can check https://www.sigidwiki.com/wiki/POCSAG for frequency lists of where pagers operate. Using the waterfall, you can home in on an interesting frequency and use that in rtl_fm to feed to multimon-ng. An example of this would be a command like “rtl_fm -f 152.180M -s 22050 | multimon-ng -t raw -a POCSAG512 -a POCSAG1200 -a POCSAG2400 -f alpha /dev/stdin >> ~/page.txt”. Breaking down this command, rtl_fm is used to control the SDR, the -f sets the frequency to the frequency entered (here it is 152.18 MHz) -s sets the sample rate to the entered value, the | sends the output to multimon-ng the -t tells multimon-ng that we are providing raw data, the -a switches tell multimon-ng to attempt to decode POCSAG512, POCSAG1200, and POCSAG2400 (different types of pager encodings, we could also include -a FLEX which is another pager encoding), the -f alpha /dev/stdin tells multimon-ng that we only want the alphanumeric data reported to stdin and the >> ~/page.txt writes the data to a text file in the home directory called page.txt. In more simple terms, rtl_fm tunes the dongle, then we pipe that to multimon-ng, multimon-ng then sends the decoded information to a text file.

Good luck with your decoding, and hopefully all the messages don’t read, “Be sure to drink your Ovaltine.”


BBS in 2019!? Say What?

Or, why would I even want to do this.

It has been a long time since I have had the opportunity to use a BBS system, and never before have I been a SYSOP. With my current status of being underemployed, I have chosen to utilize the time unwisely and have a nostolgic flashback to the pre-internet days. I can still recall begging for a modem for my Tandy 1000 HX that I started out with on this journey, but the modem would not come until we upgraded to a 386 machine with Windows 3.1 and 4800 baud (sexy right?) Ahh, Windows 3.1 with your lack of a TCP/IP stack. That PC would eventually get an upgraded modem to 9600 then to 14400, but the hard drive would never come to being a 1 GB drive. On the plus side, it did have internal storage, unlike the Tandy.

The truth of the matter is, I long for the days of BBS door games like Legend of the Red Dragon, Pimpwars, TradeWars, and others. Also, with the internet existing as it does and both Mystic and Synchronet supporting telnet, ssh, and rlogin it should be simple to network everything (famous last words).

After a few false starts, trying both Mystic BBS and Synchronet BBS, running in a 64-bit Ubuntu VM and discovering that no matter how many times I read the instructions I could not get DOSEMU to function, I was on the verge of giving up. Luckily I chose to persist, and can now play Legend of the Red Dragon 2 on my own BBS!

First step in the process was setting up the VM. For this I chose to use Virtualbox. I know full well that I can accomplish the same thing with KVM, however I am more comfortable using VirtualBox for this since I’ve been using it longer, and when all you have is a hammer….

I installed a small 64-bit Ubuntu 16.04 server VM, and installed the SSH server only. Once installed, I did the required updates and installed unrar. Mystic BBS comes packaged in a rar file, so I guess we need it.

I downloaded the 64-bit release from http://www.mysticbbs.com/downloads.html and proceeded to unrar the files as instructed. Mystic wants to install itself to the root directory, as such we need to escalate our privilege to do so, “sudo su”. then “./install”.

Up next, we changed the ownership of the mystic folder to one with less privileges. I created a new user of “bbs” and then “chown bbs:bbs -R /mystic”. Next I left the root account, and switched to my default user which has sudo privileges, as the bbs user does not.

Next, I installed dosemu with “sudo apt install dosemu” and modified the file /etc/dosemu/dosemu.conf to reflect a us keyboard layout so dosemu would not pester me every time a door game was launched.

After this, I followed the instructions in http://wiki.mysticbbs.com/doku.php?id=cryptlib to install cryptlib so I could enable logging into the bbs over ssh as well as telnet.

Coming soon….. Configuring Door Games!