UPDATE: SteamLink is now available in the experimental packages inside RetroPie. Since Hyperion uses the whatever is output to the screen to drive the LEDs, SteamLink works in this setup as well!
Back at it again. Due to funding issues, I have been using all the spare parts that I have acquired over the past 1-2 years. This week it was finally time to put the blinky lights to good use. Just about 3 years ago I had attempted to set up BobLight using a Raspberry Pi 2, Kodi, and a set of WS2801 LEDs. This worked ok, but it wasn’t the greatest. The majority of the time, only the set that was nearest to the Pi would light up, the remainder would work intermittently, if at all. This caused the project to be put on the back burner since the cost of the LED strip and connectors made it not worthwhile to replace the setup. Fast Forward 2 years, and I acquired a 5m length of WS2812B LEDs, an Arduino compatible Nano, yet another Raspberry Pi 3, and a 5V/8A power supply. Continue reading Hyperion+RetroPie+Kodi=Bliss!→
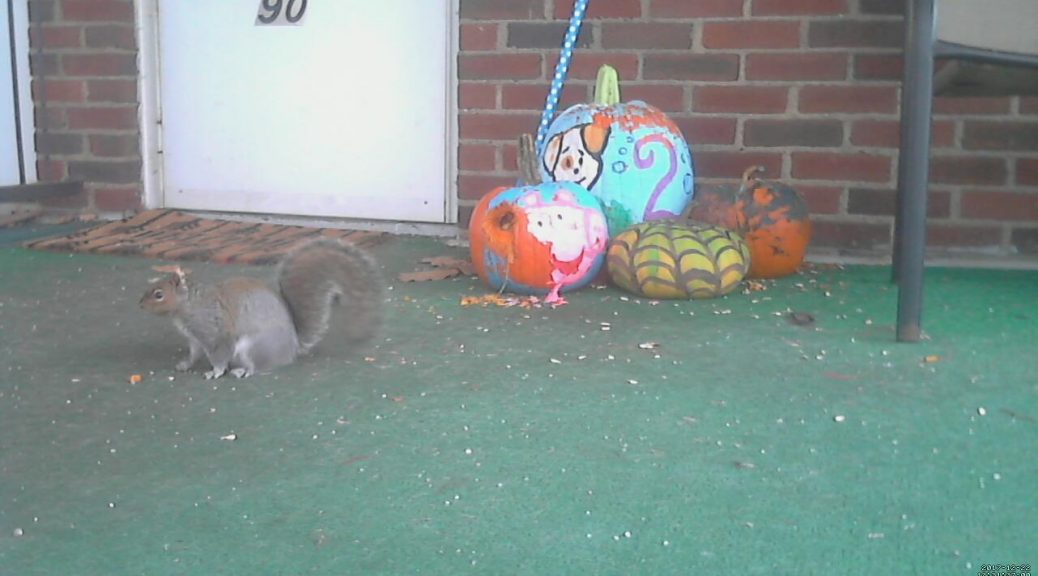
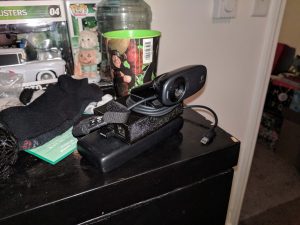
This morning I awoke and discovered that our local neighborhood squirrels have been attacking our pumpkins that have been on the porch. Not that it is a major concern, squirrels need to eat also, but this lead me to today’s project. Today I decided to create the squirrel cam. Most of the functionality was already widely available, the only major thing was putting it all together. Most of the parts for this were just laying around not being used, but I’m running out of Raspberry Pi’s to use in these projects. Between replacing multiple machines with one, running the 3-D printer off another, RetroPie/Kodi setups, I only have a Pi Zero W remaining. I think I’ll have to find a way to rectify this at some point. Anyway, back to the squirrel camera.
My first attempt at making this work involved only printing the webcam mount. This failed almost immediately when I attempted to put it on the tripod plate. The screw hole immediately stripped out and would not stay attached. With that, I then moved onto Plan B. A bit more involved than simply printing a mount, I was able to take the mount STL files, and using TinkerCAD, remix it with a snap together “Simple Raspberry Pi 3” case, to create a case with a built in mount. Admittedly, my remix could have been done better, but I was in a rush after being frustrated by the stripped screw hole. Fair warning, the case requires a bit of clean up and has a lot of support structures, but it fits and does the job, so it is a partial win. At some point I’ll redo it so it is prettier, and prints with less support, but for now, it’ll do.
I made this myself
Next up was getting the software installed to the micro SD card. Raspbian Stretch Lite was my choice to use. Burn the image to the micro SD card in whatever way you want. Since we are going to be running the Pi headless, we need to enable SSH access before we boot the Pi. With all versions of Raspbian since Nov. 2016, ssh access is disabled by default. The way to enable it, without a display, is to create a file in the boot partition named “ssh” without quotes. This will allow us to access the pi over the network and proceed with the rest of the configuration.
Once we are connected to the network with the Pi, we will update the OS, and then install all the needed software. This Pi will be running a program called motion, which will take pictures automatically when enough pixels change in the image. Ideally, this won’t cause unwanted images to be taken since I decided it will also be a Twitter bot, tweeting the images whenever a photo is taken.
Up next, we will install motion. I followed a very straightforward guide, located here. I followed along until the part where it describes adding network storage to the mix as the sd card available to me was large enough to not worry about that.
Next was deciding on how to post the photos that were taken to Twitter. This created an issue as I have never tried to run a Twitter bot before. A little bit of research later, and I found an easy to run twitter bot here. I love Github.
One key thing I found with the bot though is that the starting tweet number has to be set. It didn’t want to default to 1 on the initial run, causing errors whenever I tried to start it.
Following the instructions in the readme file, I set up Twitter API access, plugged in the required information, ran the script once with the –tweetnumber variable set to 1 and success! The pi tweeted on its own. Next up, configuring cron jobs to run the script at regular intervals.
For this, I chose to have the script run every 5 minutes. Many walkthroughs exist for setting up cronjobs so this will not be covered. Lastly, we put it all together and set it up. The Squirrel cam is tweeting at @TLPorchCam
Things I want to change:
Make the squirrel cam tweet the most recent image if it hasn’t been posted previously. The bot I used just picks randomly from the folder, without regard to the most recent. I guess eventually the pictures will get posted, but it isn’t the most effective way in my mind.
UPDATE: Success! I have squirrel pictures. 58-20171222123131
In this posting, I’ll be walking you through a setup of Retropie on the Raspberry Pi3. We’re going to be working exclusively in GNU/Linux in this tutorial, as all the necessary software is already included in most distros, and most of the file systems we will be working with are ext3/ext4. If you are unfamiliar with GNU/Linux, I will post a guide later on creating a live distro environment to use for this task. Another option would be to virtualize a GNU/Linux system through Virtual Box or similar software and have USB passthrough enabled to access the drives through the virtual machine. This is outside of the scope of this tutorial.
Necessary items for the Setup–
Raspberry Pi 3 – either by itself or as part of a kit with power supply, case, and HDMI cable.
Controllers- My favorites are iBuffalo SNES style and knock off PS3 style
A keyboard for the Pi3 — any usb keyboard will work. I like this one.
And if you want to make it look awesome, you could always get this because, nostalgia.
First, download the most recent version of RetroPie for the Raspberry Pi 3. This can be found at https://retropie.org.uk/download/. Once this is done, we can extract the contents of the archive. My personal favorite for this is a small program called dtrx . This usually is not included with your distro of choice but can easily be acquired through your package manager. On a Debian based system this would use the command “sudo apt install dtrx” in the terminal. Then type “cd Downloads” since this is where the file should have saved, and then “dtrx <filename>”. Tab completion helps here. Simply type the first few letters of the filename, which should be “retr” press tab on the keyboard, and bash should fill in the rest.
Next plug in your micro SD card to the computer, not the Pi. Wait for the drive to mount and in your terminal type “dmesg | tail”. This gives a readout of the last ten lines of the kernel buffer. This will provide you with the /dev name of your connected drive. Usually this will be in the format [sdX] with X being a letter that is displayed in the terminal, in this screenshot
Output of dmesg
, you can see mine is sdc. We can do the same with the “mount” command if you know what you are looking for, but for now dmesg is our best option. The disk I am using just happens to be sdc, so all of my commands will use this. Be sure to substitute your own that was found with dmesg | tail for your own use.
Now that we have our image file and our SD card /dev reference, we can start the process of writing the image to the card. If you have made sure that you have the right /dev reference this is not a dangerous thing, but be warned, using the wrong /dev reference will all but guarantee you a bad day. The next command is “sudo dd if=<imagefilename> of=/dev/sdX”. This will take a few minutes to write depending on the speed of your SD card and other variables. Once it is done, place the SD card into the Raspberry Pi with it connected to a screen, and let it do its magical resizing of the partitions.
Now that the partitions are resized we can start configuring. The Emulation Station frontend will load automatically, and ask you to start configuring your controllers. At this point, we are not going to configure them. I’m personally more of a fan of installing all my games on a USB drive. This is a personal choice, and if you prefer to keep them on the SD card, you can skip the next part.
Power off the PI properly. This can be done by pressing F4 and the keyboard and typing “sudo poweroff” in the terminal that loads. Once the PI safely shuts down, remove the SD card.
We are going to take the SD card, and a USB flash drive (the larger the better) to our GNU/Linux workstation. Insert the USB drive into the machine. The majority of USB drives sold in stores are by default formated to FAT32. Retropie can read this file system, but I prefer to rewrite them to be ext4 formatted. Again personal preference, lifespan be damned. To do this, I use gparted. With the drive formatted now to ext4, unplug and replug in the drive. In a terminal, run “dmesg | tail” again to find the /dev/sdX designation of the flash drive. This may be the same as it was for the SD card since the SD has been removed, and then run “sudo blkid”. We are looking to find the UUID of the disk we just formated and it will be preceded on the screen by the /dev/sdX designation. This is a long number made of hexadecimal digits, and we will copy this to the clipboard. The next step is to plug in the SD card we created, and navigate to partition that is not called “boot” this should automount under the /media/$USER/ folder. You can then copy the contents of the /home directory on the SD card to the USB drive. This can be accomplished by “rsync /media/$USER/SDCARDDIRECTORY/home/ /media/$USER/USBDIRECTORY/ -aP” . Once this completes, use the command “sync” to ensure all data is copied. then delete the contents of the /media/$USER/SDCARDDIRECTORY/home. You can use the rm command for this, like so “rm /media/$USER/SDCARDDIRECTORY/home/* -R”. Next up, we are going to tell RetroPie that we want to use the home directory we create on the USB drive as the home directory for RetroPie. We will do this by modifying the fstab file in /media/$USER/SDCARDDIRECTORY/etc/. To do this type “sudo nano /media/$USER/SDCARDDIRECTORY/etc/fstab” a simple text editor will appear that doesn’t require dark magic to navigate, unlike vim.
In nano, you’ll see something like this.
fstab screenshot
What we are going to do is add a new line, telling fstab what the USB drive is and to mount it at boot time into /home. This looks like this, and all you need to do is change the UUID to the one that was copied earlier from “sudo blkid”
fstab updated
Now that we have that set, we can proceed to copying our game files over. Since we still have our USB plugged into the PC, we can do this natively, and RetroPie has laid out the folders in a straightforward manner. All the game files go under RetroPie/roms with separate subdirectories for each game system. Additional systems can be installed later, and rsync’d across the network over ssh or via smb shares. The next part of the puzzle, is what kind of controllers do you wish to use. There are many choices out there, and some work better than others. The two of which I am a fan are listed above.
Both of these work well for casual gaming, and I’ve used both with the only caveat being that the controllers are defined in RetroPie as Shanwan Clones. The default bluetooth stack does not work with these. RetroPie takes care of installing the correct software, but bluetooth keyboards will cease to work when using any type of PS3 compatible controller. For the cost of them though in my opinion, it is worth the trade-off.
Boot up your RetroPie system now, and we can start to configure the controllers and add additional software. Once booted exit out to the command line by pressing F4 on the keyboard. Type “cd RetroPie-Setup” and then “sudo ./retropie-setup.sh” . This loads the RetroPie configuration application where we can update, install new software, and configure the PS3 controllers. First select update, and allow the software to do it’s thing. The next step I usually take is to go to manage packages then manage optional packages and install Kodi. I really like this software, and has been in use in my household since the days of the softmodded original XBox with the “Duke” controller. I also am running another Pi3 as a file server on the network that feeds videos and music to everything on the network, so one multipurpose box taking up an HDMI port is always a win.
If using the PS3 controllers your next step is to install the drivers/this is under Configuration/Tools then ps3controller. Follow the directions on-screen and you’ll be able to use the wireless controllers.
Finally, the last step of my install is to get moonlight up and running. Moonlight is cross-platform streaming software that takes advantage of the Nvidia game streaming system that is available on Windows. I have a ridiculous collection of Steam games, a Steam Link, and the Steam Controller, but my TV used to only have one HDMI port, and it got old swapping cables.
To install Moonlight, exit out to the command line again, ensure that you are connected to the network on your RetroPie, confirm you have game streaming enabled on your gaming computer and in the command line on your RetroPie type “cd” to return to the home directory. Type “wget https://raw.githubusercontent.com/TechWizTime/moonlight-retropie/master/moonlight.sh –no-check” to download the latest version of Tech Wiz Time’s Moonlight install script. Type “sudo chmod +x moonlight.sh” to allow the script run permissions. Type “sudo ./moonlight.sh” and follow the onscreen instructions.
Now that everything is installed, you can reboot the pi with “sudo reboot” or simply type “emulationstation” in the terminal, configure your controllers, and start your adventure re-playing the classics from your childhood. If you have any questions, please feel free to ask below. Any requests for where to find games will be directed to lmgtfy.com
Today I decided to install Tails to a flash drive that was not being used. While I have my system set to dual boot between Xenial and Windows 7, it is unusual for the Windows system to launch at all, unless I’m in the mood to stream Steam games over moonlight. The choices offered at the Tails website are to install from another Tails installation, or install straight from Ubuntu. Since I was using Tails for the first time in about 3 years, I chose to go straight from Ubuntu. This involved following the steps provided on the Tails website, with one small addition. Every time I tried to install, wipefs failed, and I was unable to figure out why, until the Eureka moment struck. My usb drive is set to automount on insert, and it was mounted.
The solution was simple. Unmount the drive and then run the installer. While it was a simple solution, it might be beneficial to include a warning that tails-installer will not work if the drive you are installing to is already mounted. I’ve run dd multiple times with mounted disks and never experience this issue. Hopefully my simple solution will help you with keeping your private life private, and making life easier for yourself.
For the past two years, I’ve had a hacked together system combining a desktop PC running Ubuntu headless and a Pogoplug v4 running Arch Linux ARM headless. The PC handled all download scheduling, Pihole, centralized media library database for 4 instances of Kodi, external SSH access, and for a brief time an instance of MythTV. The Pogoplug v4 handled the shared 10 TB of hard drives on the network over Samba, and formerly external SSH until a botched update broke SSH. Attempts to restore SSH access to the Pogoplug were temporarily successful, until updates once again borked it.
Now I’m rebuilding the setup under a single Raspberry Pi 3, for power consumption reasons and simply because I’m bored. Come along on the journey, while we explore if all of this functionality can be placed into an SBC (no MythTV is not being installed on the Pi 3, although previously that has occured). I’m mostly interested in how many simultaeneous HD streams it can serve up over the 100 Mbps ethernet that is shared with the USB 2.0 bus.
The first step in any project like this is to choose the base operating system which will enable the Pi 3 to do all the necessary functions. On researching the options available, I had a choice to make. 0) I can do it the hard way, start with the most recent version of Raspbian, or 1) I could install a system that has some or all of the functionality built in and add on as required.
I went with option 1, because I was on a bit of a time constraint and really wanted to finish the process in under 4 hours.
As already discussed, Raspbian was out, because although it can be done, I really wanted to be lazy. The next option was OpenMediaVault. This would serve all of my file server need, and would only need to add on SabNZBD, Sonarr, CouchPotato, HeadPhones, and MySQL to complete the process. This seemed easy enough, but attempting to log in over ssh at the start was a hassle, and mono would need to be compiled for the processor. Since I don’t have a cross compiling environment configured, it was on to plan B.
Plan B was DietPi. I had never heard of this software prior to this grand experiment, but was willing to give it a chance. After all, the setup I have currently works, the worst that would happen is I keep the existing arrangement if it fails to function.
DietPi on first boot, seemed like a winning choice. I’m a big fan of running things headless, since that means I can sit in the comfy chair at my desk, and ssh into the device. DietPi does not launch a GUI on first boot, instead it displays the ip address, user name, and password, and leaves it to you to figure out that things should be configured over SSH.
Once I was able to log in over ssh, I logged out, and performed my favorite bash command “ssh-copy-id”. I really can’t stand having a SSH server accept password authentication, and this system would not fall into that trap. Besides, I have seen way too many attempts to try to brute force a password with a user name of “pi”. This is one of the favorites to attempt by people who practice the “throw it at the wall and see if it sticks” method of intrusion. No reconnaissance, just blast everything that has port 22 open to the world with a username of pi and password raspberry, and you are bound to get a shell somewhere. I can’t really fault them, it works because many people don’t change default passwords.
On logging in, the Diet-Pi configuration wizard loaded up with many options, and to my suprise, almost everything I needed was available. PiHole, Sonarr, SabNZBd, Deluge, NFS, and Samba servers. No standalone MySQL server (many choices for webserver stacks, but I didn’t want to be installing unnecessary packages) which will be rectified later. HeadPhones was also missing from the easy list, but I can live without that for now.
After what appeared to be a very long wait for software to install, I finally was able to start configuring everything that had previously been set up between the two boxes that were in use. A great part about the software being used, is that the configuration files are the same across platforms. Copy the files to the right locations, modify a few server calls to reflect the new ip address, and back in business like before.
The incredibly hard part was configuring Samba on the pi. This wasn’t because Samba is hard in itself, but more because I had a very outdated configuration file.
All told, the total time taken was just over 9 hours to get everything “close enough” which included forgetting that I mounted the USB drives under a home directory for a user I had yet to create and wasting 2 hours trying to get NFS working rather than troubleshooting to make my smb.conf file compatible with Samba 4.